Tuesday 25 June 2013

chakki chalanasana

Chakki = Grinder, Chalana = to drive, Asana = Posture or Pose
Chuh-key-Chuh-LAANA-AAHS-uh-nuh

This yoga posture mimics the movements of a hand-moved wheat grinder, common in the villages of India. It turns out to be a fun and excellent workout for the body!

How to do Mill Churning Pose (Chakki Chalanasana)

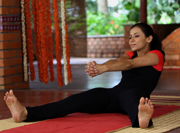
1. Sit with your  legs splayed apart.

                                                       1171
                                                      

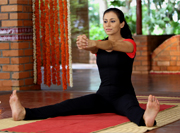
2. Clasp your hands and outstretch your arms at shoulder height in front of you.

                                                      1163

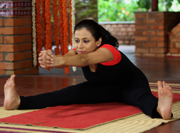
3. Takea deep breath in and start moving the upper part of your body to the front and right, forming an imaginary circle with your body.

                                                     1168

4. Inhale as you go forward and to the right, and exhale as you go backword and to the left.

                                                     1169

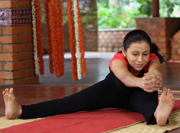
5. Keep breathing deeply and easily while rotating. Do you feel the stretch in the arms, abs, groin and legs?

6. Make 5-10 rounds in one direction and then repeat in the opposite direction. Your wheat flour is ready to be cooked!

BenefitsMill Churning Pose (Chakki Chalanasana)

  • A good preventive for sciatica
  • Tones the back, abs and arm muscles
  • Opens up the chest and groin
  • Tones the uterine muscles in females, so it is very useful in preventing painful cycles if practiced regularly
  • Consistent practice helps reduce abdominal fat
  • Also very useful in reducing post-delivery fat (however, please consult your doctor before practicing this yoga posture)

Contraindications

Do not practice this asana if you are pregnant, have low blood pressure, extreme lower back pain due to slip disc, headaches or migraine (during the attack), or had a recent abdominal surgery, such as for active hernia.

dhanurasana


This yoga posture has been named after the shape it takes – that of a bow. Dhanurasana (Bow Pose) is part of thePadma Sadhana sequence. This yoga posture is pronounced as DHUN-ur-AAHS-uh-nuh.
Dhanu = Bow; Asana = Posture or Pose

How to do Bow Pose (Dhanurasana)

  1. Lie on your stomach with your feet hip-width apart and your arms by the side of your body.
  2. Fold your knees and hold your ankles.
  3. Breathing in, lift your chest off the ground and pull your legs up and back.
  4. Look straight ahead with a smile on your face. Curve your lips to match the curve of your body! 
  5. Keep the pose stable while paying attention to your breath. Your body is now taut as a bow.
  6. Continue to take long deep breaths as you relax in this pose. But don’t get carried away! Do not overdo the stretch.
  7. After 15 -20 seconds, as you exhale, gently bring your legs and chest to the ground. Release the ankles and relax.

Benefits of Bow Pose (Dhanurasana)

  • Strengthens the back and abdominal muscles
  • Stimulates the reproductive organs 
  • Opens up the chest, neck and shoulders
  • Tones the leg and arm muscles
  • Good stress and fatigue buster
  • Relieves menstrual discomfort and constipation
  • Helps people with renal (kidney) disorders

Contraindications

Do not practice Bow Pose (Dhanurasana) if you have high or low blood pressure, hernia, neck injury, pain in the lower back, headache, migraine or a recent abdominal surgery.
Ladies should avoid practicing this yoga pose during pregnancy.

bhujangasana


This asana resembles a serpent with its hood raised. Cobra Pose or Bhujangasana is part of the sequence of yoga postures in Padma Sadhana and Surya Namaskar or Sun Salutation. Bhujangasana is pronounced as BHU-jung-AAHS-uh-nuh.
Bhujang = Snake (Cobra); Asana = Posture or Pose

How to do Cobra Pose (Bhujangasana)

  1. Lie on your stomach with your toes flat on the floor and forehead resting on the ground.
  2. Keep your legs close together, with your feet and heels lightly touching each other.
  3. Place your hands (palms downwards) under your shoulders, keeping your elbows parallel and close to your torso. 
  4. Taking a deep breath in, slowly lift your head, chest and abdomen while keeping your navel on the floor.
  5. Pull your torso back and off the floor with the support of your hands.
    Checkpoint: Are you putting equal pressure on both the palms?
  6. Keep breathing with awareness, as you curve your spine vertebra by vertebra. If possible, straighten your arms by arching your back as much as possible; tilt your head back and look up.
    Checkpoint: Are your shoulders away from your ears? Keep your shoulders relaxed, even if it means bending your elbows. With regular practice, you will be able to deepen the stretch by straightening the elbows.
  7. Ensure that your feet are still close together. Keep smiling and breathing. Smiling Cobras!
  8. Don’t overdo the stretch or overstrain yourself. 
  9. Breathing out, gently bring your abdomen, chest and head back to the floor.

Benefits of Cobra Pose (Bhujangasana)

  • Opens up the shoulders and neck. 
  • Tones the abdomen.
  • Strengthens the entire back and shoulders.
  • Improves flexibility of the upper and middle back.
  • Expands the chest.
  • Improves blood circulation.
  • Reduces fatigue and stress.
  • Useful for people with respiratory disorders such as asthma. (Do not practice this yoga pose during the attack though).

Contraindications

  • Avoid practicing Bhujangasana if you are pregnant, have fractured ribs or wrists, or recently underwent abdominal surgeries, such as for hernia.

superman pose


The Superman Pose is similar to a flying superman high in the air. This is where this yoga posture gets its nickname.
viparita = inverted/ reversed; shalabh = locust; asana = pose/posture
It is pronounced as Vip-a-RHEETH-uh shah-lah-BHAAHS-uh-nuh
This posture is particularly helpful in strengthening your lower back muscles.

How to do Superman Pose?

  1. Lie on your stomach with your toes flat on the floor; chin resting on the ground.
  2. Keep your legs close together with your feet lightly touching each other.
  3. Now stretch your arms out to the front as far as you can.
  4. Take a deep breath in and now lift your chest, arms, legs and thighs off the floor.  You resemble a flying super hero - Superman! Spread the smile on your face – superheroes are always happy, especially in flight. Rather than making an effort to raise your hands and legs more, make a gentle effort to stretch your arms and legs away from your torso. So, feel the pull that is occurring at both ends. Ensure that your elbows and knees are not bent.
  5. Keep breathing with awareness; keeping your attention on the stretch.
  6. As you exhale, gently lower your chest, arms and legs.

Benefits of Superman Pose

  • Stretches and strengthens the muscles of the chest, shoulders, arms, legs, abdomen and the lower back
  • Tones the abdomen and lower back
  • Massages the spine and keeps the back supple
  • Helps stretch the chest
  • Improves blood circulation
  • Also works at the mind level – when you take off, you can't but stay in the present moment. Even if you want to, you can't think about any problem!
  • Can be a good workout for the abs and stomach
In the Padma Sadhana sequence, Superman Pose (Viparita Shalabhasana) forms the fifth pose, after Bhujangasana (Cobra Pose).

Contraindications

Do not practice this yoga posture if you have had an abdominal surgery recently or if you are pregnant.


shalabasana

Locust Posture

Shalabasana

Yoga Asana – Locust Posture
  • Breathing in, raise the right leg up. Keep the leg straight and do not twist the hip.
  • Hold and keep breathing.
  • Breathing out, bring the right leg down.
  • Repeat steps 3-5 with the left leg. Take 2-3 deep breaths.
  • Breathing in, and with some momentum, lift both legs up, as high as possible, keeping the knees straight.
  • Hold.
  • Breathing out, bring the legs down, take the arms out from underneath, and rest.
  • Repeat the above sequence with hands facing down in step 2.

Benefits:

  • Increases flexibility and strength of the entire back
  • Strengthens shoulders and arms
  • Tones the nerves and muscles especially in the neck and shoulders
  • Massages and tones abdominal organs, and improves digestion

naukasana


Nauka = Boat, Asana = Posture or Pose
This yoga posture has been named after the shape it takes – that of a boat. Naukasana is prounced as NAUK-AAHS-uh-nuh.

How to do Boat Pose (Naukasana)

  1. Lie on your back with your feet together and arms beside your body.
  2. Take a deep breath in and as you exhale, lift your chest and feet off the ground, stretching your arms towards your feet.
  3. Your eyes, fingers and toes should be in a line.
  4. Feel the tension in your navel area as the abdominal muscles contract.
  5. Keep breathing deeply and easily while maintaining the pose.
  6. As you exhale, come back to the ground slowly and relax.
It also forms a part of the Padma Sadhana sequence, where this yoga pose is practiced after Dhanurasana (Bow Pose).

Benefits of Boat Pose (Naukasana)

  • Strengthens the back and abdominal muscles
  • Tones the leg and arm muscles
  • Useful for people with hernia

Contraindications

  • Do not practice this yoga pose if you have low blood pressure, severe headache, migraine, or if you have suffered from some chronic diseases or spinal disorders in the recent past
  • Women should avoid doing Boat pose (Naukasana) during pregnancy and during the first two days of the menstrual cycle.

setu bandhasana

Bridge Pose (Setu Bandhasana)

Setu – Bridge; Bandha – Bind, Lock; Asana – Pose, Posture
This asana is pronounced as SAY-tuh-bun-DHAHS-ana
The pose resembles a bridge, hence the name.

How to do Bridge Pose (Setu Bandhasana)

  1. To begin, lie on your back.
  2. Fold your knees and keep your feet hip distance apart on the floor, 10-12 inches from your pelvis, with knees and ankles in a straight line.
  3. Keep your arms beside your body, palms facing down.
  4. Inhaling, slowly lift your lower back, middle back and upper back off the floor; gently roll in the shoulders; touch the chest to the chin without bringing the chin down, supporting your weight with your shoulders, arms and feet. Feel your bottom firm up in this pose. Both the thighs are parallel to each other and to the floor.
  5. If you wish, you could interlace the fingers and push the hands on the floor to lift the torso a little more up, or you could support your back with your palms.
  6. Keep breathing easily.
  7. Hold the posture for a minute or two and exhale as you gently release the pose.

Benefits of Bridge Pose (Setu Bandhasana)

  • Strengthens the back muscles
  • Relieves the tired back instantaneously
  • Gives a good stretch to the chest, neck and spine
  • Calms the brain, reducing anxiety, stress and depression
  • Opens up the lungs and reduces thyroid problems
  • Helps improve digestion
  • Helps relieve the symptoms of menopause and menstrual pain
  • Helpful in asthma, high blood pressure, osteoporosis, and sinusitis

Contraindication for Bridge Pose (Setu Bandhasana)

Avoid doing this pose if you are suffering from neck and back injuries.

matsyasana

Matsyasana

Matsya – Fish; Asana – Pose
This asana is pronounced as mut-see-ahs-ana
The fish pose, if carried out in water, allows the body to float quite easily like that of a fish; hence the name.

How to do Fish Pose (Matsyasana)

  1. Lie on your back. Your feet are together and hands relaxed alongside the body.
  2. Place the hands underneath the hips, palms facing down. Bring the elbows closer toward each other.
  3. Breathing in, lift the head and chest up.
  4. Keeping the chest elevated, lower the head backward and touch the top of the head to the floor.
  5. With the head lightly touching the floor, press the elbows firmly into the ground, placing the weight on the elbow and not on the head. Lift your chest up from in-between the shoulder blades. Press the thighs and legs to the floor.
  6. Hold the pose for as long as you comfortably can, taking gentle long breaths in and out. Relax in the posture with every exhalation.
  7. Now lift the head up, lowering the chest and head to the floor. Bring the hands back along the sides of the body. Relax.

Benefits of Fish Pose (Matsyasana)

  • Stretches the chest and neck
  • Helps relieve tension in the neck and shoulders
  • Provides relief from respiratory disorders by encouraging deep breathing
  • Tones the parathyroid, pituitary and pineal glands

Contraindications of Fish Pose (Matsyasana)

Avoid this posture if you have high or low blood pressure. Migraine and insomnia patients should also refrain from doing the Fish Pose. Those who have had serious lower-back or neck injuries are strongly recommended not to practice this pose.

pavanamukthasana

This yoga pose, as its name suggests, is excellent for releasing abdominal gas. Pavanamuktasana is pronounced as PUH-vuhn-mukt-AAHS-uh-nuh.
Pavana = wind, mukta = relieve or release, Asana = Posture or Pose

How to do Wind-Relieving Pose (Pavanamuktasana)

1185
  1. Lie on your back with your feet together and arms beside your body.
  2. Breathe in and as you exhale, bring your right knee towards your chest and press the thigh on your abdomen with clasped hands.
  3. Breathe in again and as you exhale, lift your head and chest off the floor and touch your chin to your right knee.
  4. Hold it there, as you take deep, long breaths in and out. Checkpoint: As you exhale, tighten the grip of the hands on the knee and increase the pressure on the chest. As you inhale, loosen the grip. 
  5. As you exhale, come back to the ground and relax.
    1187
  6. Repeat this pose with the left leg and then with both the legs together.
  7. You may rock up and down or roll from side to side 3-5 times and then relax.
Wind-Relieving Pose (Pavanamuktasana) forms a part of Padma Sadhana, a special sequence yoga poses, taught in Art of Silence (Part-2 Course) and DSN Course.

Benefits of Wind-Relieving Pose (Pavanamuktasana)

  • Strengthens the back and abdominal muscles
  • Tones the leg and arm muscles
  • Massages the intestines and other organs in the abdomen
  • Helps in digestion and release of gas
  • Enhances blood circulation in the hip joints and eases tension in the lower back

Contraindications

Avoid practicing Wind-Relieving Pose (Pavanamuktasana) if you are facing the following health issues: high blood pressure, heart problem, hyperacidity, hernia, slip disc, testicle disorder, menstruation, neck and back problems, and after the second trimester of pregnancy.

sarvangasana

Sarvangasana

If you have had abnormal blood pressure, glaucoma, detached retina, chronic thyroid disorders, neck or shoulder injuries, consult your teacher and physician before doing the shoulder stand.
  • 1675Lie on your back. With one movement, lift your legs, buttocks and back so that you come up high on your shoulders. Support your back with the hands.
  • Move your elbows closer towards each other, and move your hands along your back, creeping up towards the shoulder blades. Keep straightening the legs and spine by pressing the elbows down to the floor and hands into the back. Your weight should be supported on your shoulders and upper arms, and not on your head and neck.
  • Keep the legs firm. Lift your heels higher as though you are putting a footprint on the ceiling. Bring the big toes straight over the nose. Now point the toes up. Pay attention to your neck. Do not press the neck into the floor. Instead keep the neck strong with a feeling of tightening the neck muscles slightly. Press your sternum toward the chin. If you feel any strain in the neck, come out of the posture.
  • Keep breathing deeply and stay in the posture for 30-60 seconds.
  • To come out of the posture, lower the knees to forehead. Bring your hands to the floor, palms facing down. Without lifting the head slowly bring your spine down, vertebra by vertebra, completely to the floor. Lower the legs to the floor. Relax for a minimum of 60 seconds.

Benefits

  • Stimulates the thyroid and parathyroid glands and normalises their functions
  • Strengthens the arms and shoulders and keeps the spine flexible
  • Nourishing brain with more blood
  • Stretches the heart muscles by returning more venous blood to the heart
  • Brings relief from constipation, indigestion and varicose veins

chakrasana

Chakra - Wheel; Asana – Pose
The asana is pronounced as Chuck-rah-AH-sana

How to do Lying-down Body Twist (Chakrasana)

  1. Lie on your back with arms horizontally stretched out in line with the shoulders.
  2. Bend your knees and bring your feet close to your hips. The soles of the feet are fully on the ground.
  3. Swing the knees to the left until the left knee touches the ground (the right knee and thigh are resting on the left knee and thigh). Simultaneously, turn the head to the right and look at your right palm.
    Checkpoint: Shoulder blades must touch the ground. While the body is twisted, there is a tendency for one of the shoulder blades to get lifted off the ground. One must work against this tendency for the stretch to be effective.
  4. Feel the stretch in the thighs, groin, arms, neck, stomach and back as you hold the pose. With each exhalation, relax deeper into the pose.
  5. After a few minutes, you may slowly turn the head back to the center, and straighten the torso and legs.
  6. Mirror the pose on the other side.

Benefits of Lying-down Body Twist (Chakrasana)

  • Stretches the spine and quadriceps.
  • Brings deep relaxation to the body and mind

Contraindications of Lying-down Body Twist (Chakrasana)

Avoid this posture in case of spinal injuries.

shavasana

Shava - Corpse; Asana - Pose
1479
The asana is pronounced as Shuh-vah-sana
This pose gets its name from the recumbent posture of a dead body. It is a position of rest and relaxation, and is usually practiced towards the end of a yoga session – a session that typically begins with activity and ends in rest; a space or pause when deep healing can take place.

How to do the Corpse Pose (Shavasana)

  1. Lie flat on your back, preferably without any props or cushions. Use small pillow below your neck if absolutely required. Close your eyes.
  2. Keep your legs comfortable apart and let your feet and knees relax completely, toes facing to the sides.
  3. Place your arms alongside, yet a little spread apart from your body. Leave your palms open, facing upward.
  4. Taking your attention to different body parts one by one, slowly relax your entire body bringing your.
  5. Begin with bringing your awareness to the right foot, move on to the right knee (as you complete one leg, move your attention on to the other leg), and so on, and slowly move upwards to your head, relaxing each part of the body.
  6. Keep breathing slowly, gently, deeply and allow your breath to relax you more and more. The incoming breath energizes the body while the outgoing breath brings relaxation. Drop all sense of hurry or urgency or any need to attend to anything else. Just be with the body and the breath. Surrender the whole body to the floor and let go. Make sure you don’t fall asleep!
  7. After some time, about 10-20minutes when you feel fully relaxed, keeping your eyes closed, slowly roll onto your right side. Lie in that position for a minute or so. Then, taking the support of your right hand, gently sit up into a seated pose such as Sukhasana (Easy Pose).
  8. Keep your eyes closed and take a few deep breaths in and out as you gradually become aware of your environment and the body. When you feel complete, slowly and gently open your eyes.

Benefits of the Corpse Pose (Shavasana)

  • This posture brings a deep, meditative state of rest, which may help in the repair of tissues and cells, and in releasing stress. It also gives time for the yoga workout to sink in at a deeper level.
  • This posture leaves you in a state of rejuvenation. It is the perfect way to end a yoga session, particularly if it has been a fast-paced one.
  • It helps reduce blood pressure, anxiety, and insomnia.
  • This is an excellent way to ground the body and reduce the Vata dosha(imbalance of the air element) in the body.

Contraindications of the Corpse Pose (Shavasana)

None (unless your doctor has advised you, for some medical reason, to avoid lying on your back).

konasana

Kona =Angle; Asana = Pose/Posture
(This posture is Pronounced as:konah-sanah)

How to do Angle Pose (Konasana):

  1. Stand with your feet at a comfortable distance apart.Balance your weight equally on both the feet.
  2. Breathing in, raise your arms overhead and join the palms together,interlacing the fingers to form a steeple position.Keep the arms touching the ears.
  3. Breathing out, bend to the right.Put more attention on straightening the elbows,pressing the feet firmly into the ground,and moving the pelvis to the left.
  4. Hold the pose. Feel the stretch on the side and,relax in this posture.Keep taking deep,gentle breaths.
    1659
  5. Now breathe in and,return to standing position.
  6. Breathing out,bring the arms down.
  7. Repeat the pose bending to the other side.

Benefits of the Angle Pose (Konasana)

  • Stretches the sides of the body and the spine.
  • Tones the arms,legs,and abdominal organs.
  • Helpful in relieving back pain.
  • Increases the flexibility of the spine.
    1656

Contraindications of the Angle Pose (Konasana) 

  • Spondylitis patients should avoid this pose.